Saturday, September 18, 2010

Back in Business! First Side Cut!

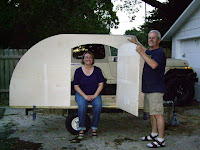
A slight delay as we accumulated funds to continue forward in our teardrop build. Our next stage is drawing the radii for one side and a door and cutting out our first side! We're using birch plywood for the sides because we love the "woodie" look of vintage Benroy teardrops. Here's an example of one a marvelous local teardrop builder displayed at the Kansas Air Museum Car Show last weekend.


So, onto our build...once we had drawn each radius--front edge, upper door edge and back slope, we were ready to cut, or so we thought. We happened to look at the photo above and noticed the builder had made his door slightly larger than our design. Because we found his teardrop easy to enter and exit, we increased the width our door another six inches and changed the upper radius to match.

A cut to create the front radius, a cut to create the back-sloping edge of the galley and three cuts to create the door opening, and here's what we've created so far.


If you're wanting more detail about how we got to this point, we've posted our side design and cut photos below. Next up, we'll buy another piece of birch plywood and reverse the process, then it's on to creating oak stringers to support both them and the roof. What a blast!


Tuesday, July 20, 2010

Stage 2: Building the Floor


What a journey this has been! Looking at zillions of pictures of other people's teardrop builds, dreaming about how we'd like our trailer to look...that's how we've spent the last two weeks. (Did we mention haunting every building supply store for thirty miles??)

One thing we know for sure about the teardrop camping community, they're open and willing to share what they know. We've watched YouTube videos, looked through lots of "build galleries" and read hundreds of comments from people who've been where we're going. It's been wonderful having the benefit of all that knowledge steering us around big mistakes as we start our build.

So--a status update! The floor, complete with underbed stowage, is built and ready to attach to the trailer frame. Kate hopes to paint the trailer in the next couple of days using Rustoleum spray paint. Also on the agenda is undercoating the entire bottom surface of the floor with spray-on truck bed liner.

Here are the pictures from this stage of the build.


Monday, July 5, 2010

Asserting Our Camping Independence, Day One

On Independence Day, 2010, it was time to stop talking about building a teardrop travel trailer and start doing it. My wife and I have been intrigued with the thought of owning one of these tiny travel trailers for years, but the price of pre-builts kept us away.

If you're not familiar with teardrops, you're missing a fascinating world of vintage, new and homebuilt travel trailers. For decades, campers who like to live large in small spaces have turned to teardrops as a compact, easy to pull, and economical camping solution.

Most teardrops have sleeping quarters in a compact interior with some pretty amazing storage configurations built in. Outside, you'll find a rear galley hatch that swings up on most models to reveal a clever, compact kitchen for easy campsite cooking.

Here are some great websites with images of manufactured and homebuilt teardrop travel trailers:
Thanks to forums like Teardrops & Tiny Travel Trailers, we found abundant information and inspiration to build our own. This blog will be a record of our tears, trials and triumphs as we build our first teardrop camper.

Day One:
With an assist from CraigsList.com and a friendly young Wichita pastor, we secured the perfect trailer for our teardrop. Weighing in at a lean 145 lbs. on a muscular 4 x 8 frame (complete with leaf spring suspension), this beauty will form the foundation of our teardrop.

It will take awhile to create our dream travel trailer (since we're buying plywood one sheet at a time) but we're revved up and ready to build. Hope to post more progress soon!

SmallSpaces